Home Menu

Development

May 16, 2016

Lighting for Mobile VR

The goal was to drop users into the action, allow them to choose Captain America or Iron Man and then fight their way through 8 levels of Crossbones and his Henchmen.

Multi-lightmap walkthrough for Kellogg’s Marvel’s Civil War VR

The goal of Kellogg’s Marvel’s Civil War VR was to drop users into the action of the feature, allow them to choose Captain America or Iron Man and then fight their way through 8 levels of Crossbones and his Henchmen. The levels themselves were created from film references – with a generous helping of our own creative interpretation – and resulted in 3 main maps: Lagos, Berlin and the Leipzig Airport.

We set the experience in the early evening to help reduce eye strain but in large part it was to allow for much more dramatic lighting. But because our target was mobile VR we were severely limited in what we could do with real-time lights and shadows. To ensure the experience ran across as many devices as possible, we would need to bake the lighting into the scenes using light maps.

Traditionally, light maps meant static lighting. Our goal, however, was to build an experience that was much more dynamic. This lead us to the Multi-light maps technique: a way to get a lot more life into a VR environment without breaking the lighting budget.

Here’s a breakdown of the Multi-lightmap process:

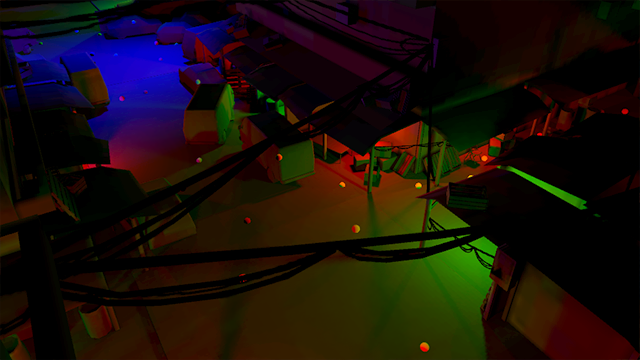
First, the environments were divided into sectors. Each sector was given one main light and a couple accent lights. Generally, the main light is something like sunlight or other primary light source that is consistent throughout all sectors. The accent lights are secondary light sources such as lamp posts or traffic signals and have their own color and intensity animated as needed. These lights should not affect any objects outside their sector or unexpected results may occur. Once we had our map subdivided into sectors we began lighting. This is where we took a different approach: Instead of baking the light colour and intensity, we used the light map to just bake light position and shadows. This was accomplished by using the RGB channels of the light map to store the lighting information for each light.

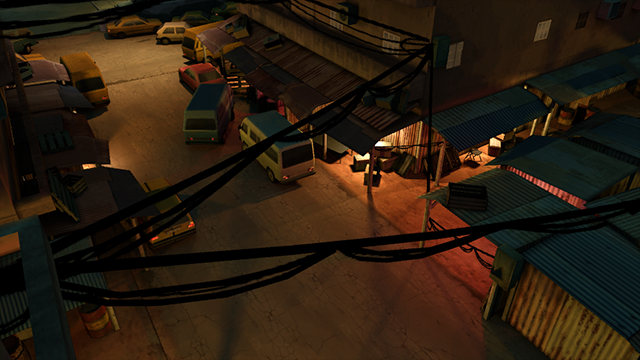
These 3 channels is the reason we are limited to one main and two accent lights per sector. Red could be used for the main light while blue and green are used for the two accents, for example. This gave us something that looked like this:

sputlight_probes_01edit

In this case, the red channel was used as consistent point lighting throughout the Lagos market rather than a directional light that might be used in a daylight setting. An ambient occlusion pass, saved as an alpha channel, was also included in the light map and, with a custom shader we assigned colour and intensity to each of the channels and ended up with something like this:

sputlight_final_01edit

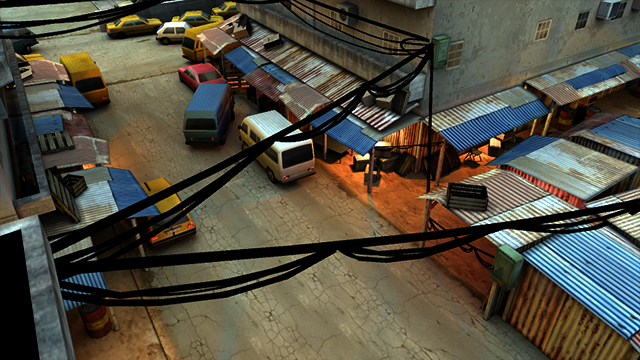
One of the benefits of controlling lighting intensity and colour through a shader is it becomes easy to make adjustments to lighting in real time. The image below is using the same light maps with different colours and intensities assigned in the materials.

sputlight_alt01_01_1

Since the ambient occlusion pass is also available through the shader more drastic lighting changes can be easily achieved such as changing the night scene to an overcast day:

sputlight_alt02_01

Again, this is achieved by adjusting material settings using the same initial RBG light map. With all these lighting options tied to materials it can be difficult to sync all the color setting across materials in each sector – and even harder to animate them all. To solve this, we came up with a Light Manager script.

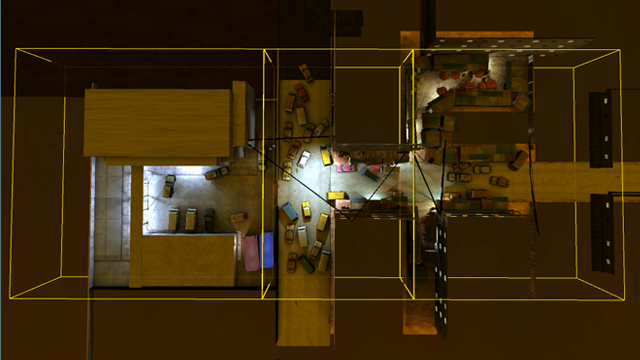
This script is added to a null object and pulls in all material attributes from objects within its volume which makes them editable in one place. An animation controller is then added allowing the lights to be animated using only one animation clip per sector. This, in turn, allows all objects affected by the same light to have the same settings even if a different material is being used – making it a very powerful tool.

The three light managers for the Lagos map can be seen in yellow below:

sputlight_manager_01

Once we had the environment looking the way we wanted, we realized we would have skinned characters – Crossbones’ henchmen – running through these maps. And if they were not affected by the flickering lights or by passing through the pools of light that made up the levels, it would break the immersion.

The Light Manager gave us access to all of the colours and intensities of the lights so it was a matter of coming up with a way to apply these to a mesh without a static light map. The key was utilizing light probes – though not exactly in the way they were intended. In the same way the light maps were re purposed, lighting probes were baked with the same RGB light data as the static light maps. But since the original lighting is baked outside of Unity, the lighting set-up had to be mirrored in Unity to bake the probes.

sputlight_probes_01edit

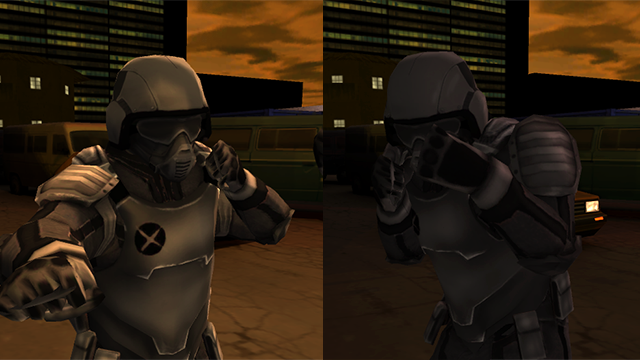
To this end, we wrote a shader that was similar to the one that was used for the light maps but instead used the RGB channels of the lighting probes. Since all of the material attributes were named the same in the Light Manager, we were able to apply the same colour and intensity to the skinned meshes as we did for the environments. This allowed the henchmen to blend into the scene seamlessly, picking up accent lights and, in the example below, flickering lights:

sputlight_skinned_01edit1

This technique was used to throughout out the entire project allowing us to create dynamic lighting effects and enhancing the immersive feel of the experience without using a single real time light.

Try it for iOS https://itunes.apple.com/us/app/kelloggs-marvels-civil-war-vr/id1093762466 or Android https://play.google.com/store/apps/details?id=com.kelloggs.civilwarvr

July 2, 2015

Google Cardboard Developer Tools: Black Screen Issue

In the interest of sharing our experiences and furthering the Cardboard community, we wanted to share an issue we dealt with during development of some VR experiences and how we fixed it.

Google Cardboard has brought virtual reality to masses with it’s simple, effective, and inexpensive design. In the interest of sharing our experiences and furthering the Cardboard community, we wanted to share an issue we dealt with during development of some VR experiences and how we fixed it.

We started to experience a strange bug on iOS devices when testing our apps that would give us a black screen saying “Let’s get you set up” instead of actual game view. By looking at the Debug.Log() messages, it was clear that the game was working and seemed to be running behind the black screen. After trying several work-arounds, the “Let’s get you set up” message was still blocking the view. Although we strongly believe in the power of Google, a thorough search did not produce any results on how to fix this. So we started to dig in.

After a couple of hours of banging our heads against the wall, we noticed that this screen appears after the game is started and a couple of frames where rendered. It seemed it was definitely related to iOS SDK and was probably some ViewController pushed on top of the game view controller. So we decided to find out where that code was called from.

After some file “grep’ing” we found out that these texts are stored in libplatform.a binary and we had no source code of it. The next step was to try to prevent this code from executing and we started exploring all of the SDK code we had hoping to find out calling points. Luckily, the solution came pretty easily from there. The CardboardAppController.mm has a couple of functions, and one of them is “void launchOnboardingDialog(){…}” so by just commenting it’s content we solved this black screen problem!

Hopefully this helps some of you out there who may be dealing with the same issue. This was a quick fix, but we are working on a solution that will stop this problem from happening in the first place. Stay tuned…

November 3, 2014

Augmented Reality: When What You Really Want Isn’t Close at Hand, but Your Phone Is

You really want Polaris’ new Slingshot, I mean really, really want it.

You really want Polaris’ new Slingshot, I mean really, really want it. It’s a super-slick, three-wheeled ATV that looks way better than that Speed Buggy thing we all saw on Saturday morning cartoons. Great. So what’s stopping you from taking a look at it? Well, as of now only a few showrooms have it and none of them are near you.

No problem. Polaris’ Slingshot 360º App has you covered. Using augmented reality technology, you can see the Slingshot from every angle imaginable.

Bully! in collaboration with Integer Group created the app with the latest in Augmented Reality technology from Vuforia, a product of Qualcomm Connected Experiences, Inc. The actual machine may not be in front of you, but it feels close at hand because of the stunning detail captured in the Unity3D-based model. The virtual vehicle can be rotated and scaled for optimal viewing and interaction.

Augmented reality has a real strength in the practical application of increasing customer interaction prior to full-scale product launch. The time-to-market window is shrinking and revisions and adjustments are being made right up to the time a product is made available to the public. Feedback loops are faster and more direct from consumer straight to producer. Augmented reality creates a dialogue that is grounded in a more hands-on experience without actually seeing the product in person.

So go ahead, download the Slingshot 360º app and experience it for yourself. You don’t even have to leave your couch.

August 15, 2014

Scaling the Experience

One of the beautiful things about Unity 3D is its ability to port to multiple platforms. With a “check of a box” *, content can be packaged for deployment across mobile platforms, desktop executables, web browsers, wearable systems, and all the major consoles.

Unity 3D Plus Smart Content, Smart UI and Smart Apps

One of the beautiful things about Unity 3D is its ability to port to multiple platforms. With a “check of a box” *, content can be packaged for deployment across mobile platforms, desktop executables, web browsers, wearable systems, and all the major consoles.

* Ok. Not quite a check of a box, says my developers.

Wrap the content with a smart UI system, however, – one that adjusts not only for aspect ratios but also for device specific control signals – and you have a single stream of content that can be experienced across multiple channels.

Take it a step further and build in a structure that enables client-side apps to pull down only what suits the user experience for that device, and marketers have the ability to deliver responsive, channel-specific experiences to a broad audience from that single set of content.

Benefits include the cost of content creation is amortized across these channels, and built-in continuity for brand messaging no matter how it is accessed.

Example 1 – Automotive Marketing

An automobile manufacturer may develop a very deep content stream containing all options for all vehicle models. If structured correctly, and by utilizing a responsive UI system, apps can be distributed to targeted channels – cross-platform mobile, dealer kiosks, and tradeshow installations. These then automatically present experiences tailored to the platform.

• The mobile experience assumes a more leisurely exploration of the content stream and allows for a deep dive into the full range of vehicles and options.
• A dealer kiosk checks inventory and promotes only what is in stock and only at a mid-level depth to encourage interaction with sales associates.
• A gesture-based tradeshow installation features premium models and engages passersby in quick, attention-getting interactions designed to keep people moving.

And because each pulls from the same content stream, updates to the stream automatically update all channel experiences.

Example 2 – Consumer Packaged Goods Brand Engagement

Cross-channel content utilizing this strategy is not restricted to product presentations. Narrativized content, interactives or storylines, can be deployed in a responsive, content stream system as well.

Created as part of a Starcom pitch, these Keebler concepts illustrate a cross-platform deployment of several interactives designed for a Create-a-Cookie/Share-a-Cookie campaign. Each revolves around ingenious ways the Elves create cookies and includes a global Cookie Counter that tallies all digitally created cookies across all channels.

On mobile platforms, an Elf greets the user, frames the experience with Keebler messaging and challenges the user to create a cookie type of their choice. Each interactive begins with simple cookie creations, for instance moving a helper Elf – holding a large blank cookie – back and forth to catch falling chocolate chips. Once mastered, more elaborate versions of the theme are presented where the user can create an increasing number of cookies at a time.

keebler_endcap_colorpos-copy

For Point of Sale (POS) displays, content is more streamlined. The Elf presenter – looks out from the Keebler tree window and waits for a user. A Leap Motion sensor allows swipe gestures for interaction and, in the chocolate chip cookie interactive, controls the movement of the Elf catching chips. When time runs out, the cookie is virtually bagged and the user is prompted to share a cookie with a friend and, then driven to mobile or social channels.

keebler_endcap_colorkinect-copy

A Magic Mirror/Kinect sensor variation of the POS – for theaters or malls with more floor space – presents an Elf MC that actively tracks and waves to users as they pass. And instead of an Elf holding a blank cookie, the cookie is virtually composited in the user’s own hands. The user must then move back and forth within a certain area to catch virtual chips falling from above.

keebler_tree_color-copy

Larger installations, driven by a combination of Leap Motion, floor and Kinect sensors, spread the interactive content out across multiple windows for broader interaction. Also introduced here is an accountant Elf who is seen counting digital cookies from other channel deployments.

Scaling the Experience

The explosion of digital platforms is opening up many more channels for marketers to reach their audience. To take advantage of this, without breaking the bank, content needs to be designed in a way that effectively scales to different platforms, from mobile to desktop and beyond. Unity 3D gets you half-way there but to truly accomplish this, what’s needed is a careful structuring of the content, a UI that adjusts to the device, and client-side apps that tailor user experience.

December 30, 2012

Natural User Interface in Mobile AR: SOUR PATCH KIDS – In Sour Vision

Bully! recently launched a new Augmented Reality game for Mondelēz International promoting the “SOUR THEN SWEET” SOUR PATCH KIDS candy and their X-box game WORLD GONE SOUR.

Bully! recently launched a new Augmented Reality game for Mondelēz International promoting the “SOUR THEN SWEET” SOUR PATCH KIDS candy and their X-box game WORLD GONE SOUR.

The game, found on the App Store (here) uses AR image markers (found here and here) to spawn a Bully! created set featuring Dolly Doll, a main boss character from the X-box game.  Dolly, controlled by the mischievous Yellow SOUR PATCH KID character, throws anything at hand – toy blocks, doll heads, firetrucks – at the user.  The user must dodge the projectiles and, with the help of the Green SOUR PATCH KID character, throw tag-alongs (small SOUR PATCH KIDS) back at Dolly to win.

Beyond being among the first AR advergames, a key differentiator of the game is that the user must actually duck to avoid being hit by virtual projectiles – not just move back and forth with on-screen buttons but physically move his or her body to avoid being hit by the Dolly’s  barrage.

This technique, utilizing an operation that comes ‘naturally’ to people as an input to computer interaction, is referred to as a natural user interface (NUI.).  This kind of interaction is being actively explored by groups such as but in its infancy with mobile device experiences.

“One of the things we wanted to explore with the SOUR PATCH project was how NUI inputs could be used to add a new dimension to mobile game play – where the user has to move in real space to interact with virtual content – or in the case of SOUR PATCH game, duck the virtual blocks Dolly Doll throws.” said Carlson Bull, Creative Director and founder of Bully! Entertainment.
“As mobile technology progresses we’ll be able to utilize this kind of real-world interaction to create some very interesting engagements.” Says Bob Berkebile, VP of Technology and Innovation.   “We can envision a new genre of experiences that seamlessly blends natural inputs and virtual content to dramatically enhance game play, learning and brand activations.”

“The SOUR PATCH game is a step toward this future,” said Bull.  “When AR and gesture recognition systems make their way into eye ware, a world of possibilities will open up.”